e-Marketer Interaction Event Tracking
For e-Marketer to generate meaningful recommendations, it has to know whenever visitors interact with a product/article/video, and what type of interaction they’re having.
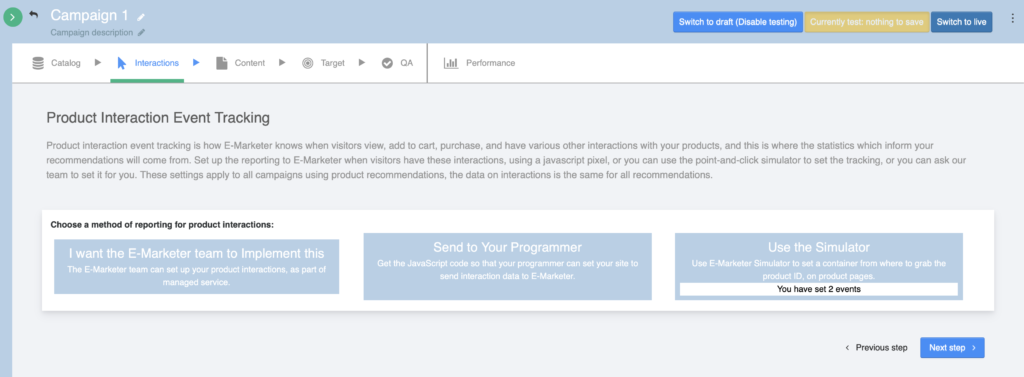
To accomplish this, you will need to go to the product recommendations wizard, and the step labaled “Interactions”. This is where you can make the one-time setting to tell e-Marketer how to monitor interactions, or request the e-Marketer team to do it for you (service included with all packages). You also have the option to send your programmer the javascript pixels to fire for each interaction, although this is not usually necessary.
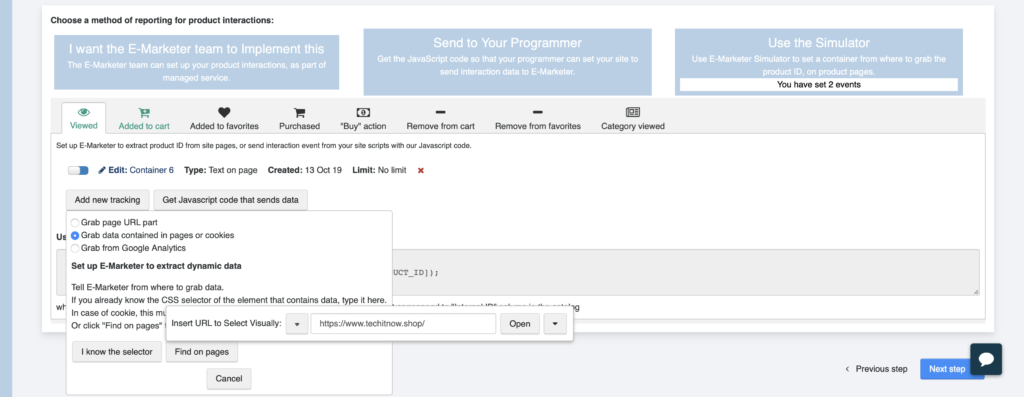
To set it yourself, click simulator, and then use the simulator interface to determine how to set each interaction.

The first interaction is a view. e-Marketer knows whenever a visitor views a product, if they navigate to that product generically, or if they clicked on a e-Marketer recommendation widget to view that product. The key is for e-Marketer to know where on the page to find the unique product ID, which could be the title, SKU, or even the URL. Whatever it is, it must match the product ID in your feed.
The next possible actions for them to take may be to “Like,” “Add to Cart,” “Purchase,” and other similar actions for content and products. e-Marketer tracks and is aware of all of these interactions, once tracking is set up. The tracking is essentially the same for all of them, you simply tell e-Marketer which element of the page to track, for instance:
- The Add to Cart button, for tracking when items are added to cart
- The Like or Favorite button, for tracking when items are liked or favorited
- The Comment Submit button, for tracking when content is commented on
- The Thank You page URL, for tracking when a purchase has been completed.

Once e-Marketer knows about the interactions listed above, it can generate recommendations that take them into consideration. For instance, what were the products most often viewed after this product? What products were bought together with this product? Furthermore, e-Marketer can learn more about visitor interests based on interactions with products and the interest tags connected to them in your feed; for example, if visitors buy baby car seats, this could perhaps flag them as having an interest in baby products.
The interactions being monitored need to be consistent with your product catalog. When you set e-Marketer to monitor and record the visitors viewing a product, the monitoring needs to be able to record a unique ID that represents a unique product in your product catalog, thereby allowing e-Marketer to take into consideration the product attributes and associated interests of that product.
How to Set e-Marketer to Monitor Views:
There are 2 ways to set up product interaction event tracking: you can programmatically set your site to fire a javascript event, by using the product ID and type of interaction, or use the e-Marketer simulator to grab the data from the page, whether it is in cookies or meta tags, or to be selected visually on the page (such as a SKU visually presented on each product page), or URL parameters. Basically, every data grabbing option in the simulator is available, as long as it does the job and sends e-Marketer the view event, whenever a visitor visits the page.
What if you don’t have a product ID on the page that matches a product ID in your catalog?
In this circumstance, you or your IT service can add the ID to the page as a Javascript variable, or inside a hidden HTML ID, or if that’s not possible, you can use a less unique identifier (if there is no other way) such as the product title, or URL.
In that case, you can set e-Marketer to grab the product title/URL, and the title/URL is going to be used as ID. When you upload or synchronize your catalog, instead of using the product ID in the column, (“Product Internal ID”) you choose the product title/URL as the Product Internal ID; that way, e-Marketer can make the connection.
How to Set Add to Cart or Like Event
If you need to send the event “Like” or “Add to Cart,” those events can be sent from a page without product ID. If they are sent from the same page URL that sent the product ID before, e-Marketer will automatically assign this event to that last ID.
However, in case you need to send a specific ID, for example, if it was an upgrade product, you can send the Add to Cart event with the product ID, which will override the previous ID.
You can use the simulator to grab the product ID, and send the Add to Cart event only if the visitor clicked on page elements such as the Add to Cart button
QA interactions events
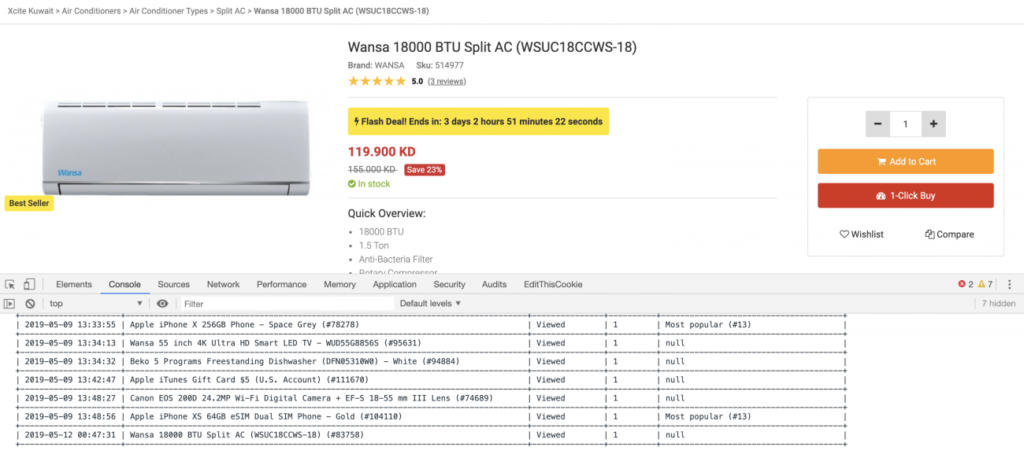
If you have set event monitoring correctly, you can see in console (when you are in e-Marketer testing mode ) the list of event from current product view to products in your cart or wishlist.

Special Event Type:
e-Marketer remembers from it’s entire lifetime on your site (unless you clear it) the different interactions and states that the visitor has had with your products, meaning that if the visitor added a product to his cart, e-Marketer will remember it, and might continue showing recommendations for that product, or send email alerts when the price changes for that product, until you tell e-Marketer that the visitor removed the product from his cart, or bought the product. You can use a special event to flash out all products together, for example, “check out all events,” meaning you can set e-Marketer to remove these interests whenever a visitor clicked on the cart
You can use a special event to flush out all the products together; for example “Check Out All Events,” meaning you can set e-Marketer to remove these interests, whenever a visitor clicked on the cart checkout button, to check out all products that are currently in the visitor’s cart or remove all when visitor clicked on the empty cart button.
log Interaction Events usign JavaScript :
e-Marketer allows you to log Interaction Events from your JavaScript. This is an optional, alternative way of setting up product interactions monitoring.
In the code below, substitute PRODUCT_ID with value that appears in your Product Catalog in the “Internal ID” column, which is the Product ID used by e-Marketer (If you have a product, let’s say a hat, with different colors, the ID should be the group ID of all such hats).
You can check your product catalog here: https://e-marketer.io/site/tracker/condition/index/#cat=Accountsettings%2F Recommendations%2FProducts%20catalog
// 1. Product Viewed Event – Send it from every view of a product page.
(self.e-marketer=self.e-marketer||[]).push([“Product Viewed”, PRODUCT_ID]);
// 2. Added to Favorites (wishlist) Event – Send it when a visitor saves a product to wishlist or like list.
(self.e-marketer=self.e-marketer||[]).push([“Product Liked”, PRODUCT_ID]);
// 3. Removed from Favorites Event – send it when a visitor removed a product from their wish/like list.
(self.e-marketer=self.e-marketer||[]).push([“Product Unliked”, PRODUCT_ID]);
// 4. Added to cart event – send it when a visitor adds a product to their cart.
(self.e-marketer=self.e-marketer||[]).push([“Product Added to cart”, PRODUCT_ID]);
// …or with quantity (number of items)
(self.e-marketer=self.e-marketer||[]).push([“Product Added to cart”, PRODUCT_ID, ‘Quantity’, QUANTITY]);
// 5. Buy Event for Particular Products – send it when a visitor purchased a product, you need to send events for each product, or use the “Buy All Event” to set all products in the visitor’s cart as purchased.
// Note: the transaction sum will be calculated according to prices that appear in the product catalog.
(self.e-marketer=self.e-marketer||[]).push([“Product Purchased”, PRODUCT_ID]);
// … with quantity (number of items)
(self.e-marketer=self.e-marketer||[]).push([“Product Purchased”, PRODUCT_ID, ‘Quantity’, QUANTITY]);
// 5a. “Buy All” Event – Convert all the products that have been Added to cart to “Purchased”.
(self.e-marketer=self.e-marketer||[]).push([“Products Purchased”]);
// 6. Remove Particular Products from Cart Event
(self.e-marketer=self.e-marketer||[]).push([“Product Removed from cart”, PRODUCT_ID]);
// … remove all from cart. Convert all the products that have been Added to cart to “Viewed”:
(self.e-marketer=self.e-marketer||[]).push([“Products Removed from cart”]);
e-Marketer calculates the sum based on the prices as they appear in the product feed; you can also send the total transaction after tax, shipping, coupons etc., thus will appear under the conversion goal value in e-Marketer UI.
<script>
(self.e-marketer=self.e-marketer||[]).push([“Event”, “Purchase”, “1”]);
</script>

